The sidebar is a prime spot for incorporating product filters on an eCommerce site, offering customers a convenient way to refine their searches.
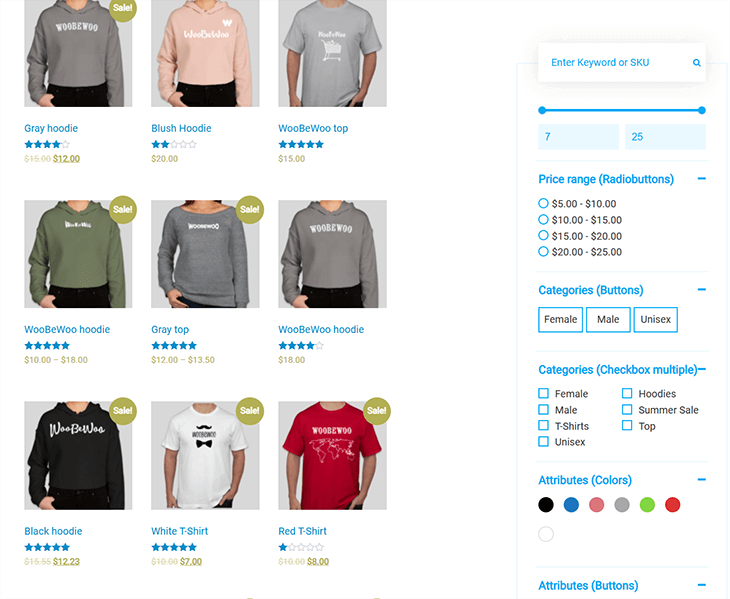
Looking to enhance your WooCommerce store by adding product filters to the sidebar? This comprehensive guide has everything you need. Here’s what you’ll discover:
- A deep dive into WooCommerce’s default filter functionality, along with a clear step-by-step setup process for your store.
- An in-depth look at the top WooCommerce sidebar filter plugin and its key benefits.
- A detailed, step-by-step tutorial for setting up sidebar filters using both WooCommerce’s native features and the powerful WooCommerce Product Filters plugin.
- Expert tips and best practices to ensure your sidebar filters deliver an optimal user experience.
We’ll start with an overview of WooCommerce’s built-in sidebar filter widgets and walk you through how to configure them efficiently. Let’s get started!
Comprehensive Insight into WooCommerce’s Built-In Sidebar Filter Widgets
The larger your product catalog, the more essential an effective filtering system becomes. When your store features hundreds or even thousands of items, navigating without the ability to filter by specific criteria can turn into a frustrating and overwhelming experience for your customers. Without intuitive filters, potential buyers may quickly leave your site, feeling overloaded by the sheer number of options, ultimately leading to lost sales opportunities.
WooCommerce provides a set of default sidebar filters to help streamline the shopping experience. These include:
- Filter by Stock: Allowing users to view only in-stock items.
- Filter by Price: Helping customers find products within their budget.
- Filter by Attribute: Offering filters based on product features like size, color, or material.
- Filter by Rating: Enabling shoppers to browse based on customer reviews.
Additionally, WooCommerce offers an “Active Filters” block, which visually separates the filters currently in use. This feature allows customers to remove individual filters or clear all active filters with a single click, enhancing ease of use.
These filters are text-based and can be displayed in various formats, such as checkboxes, dropdown menus, or a dynamic price slider, making them versatile for different store layouts and user preferences. For instance:
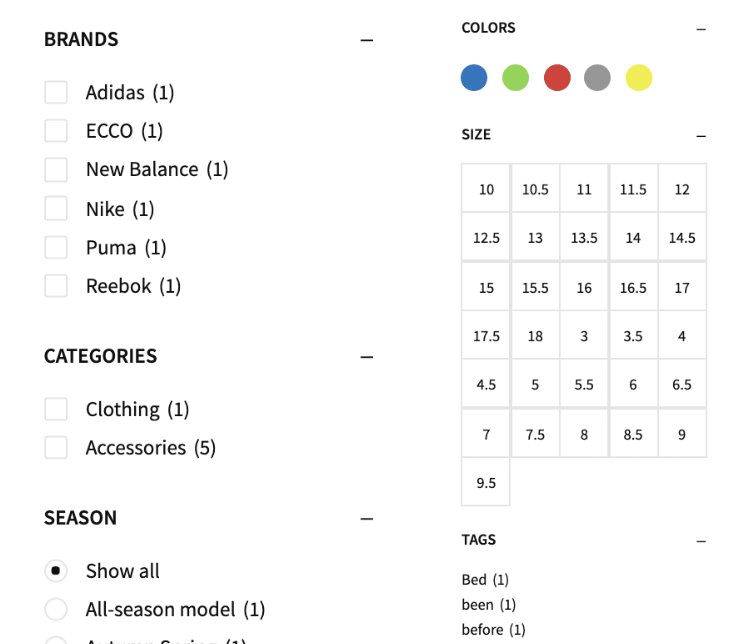
Implementing these tools not only improves navigation but also creates a seamless and enjoyable shopping experience, encouraging customers to stay longer and make purchases.
Step-by-Step Guide to Adding Default Sidebar Filters in WooCommerce
Access the Widgets Section:
In your store’s admin dashboard, go to Appearance → Widgets to manage the widgets displayed on your site.
Choose the Sidebar Panel:
Locate the specific sidebar area where you want to add filters. Click on the “+” icon to insert a new block
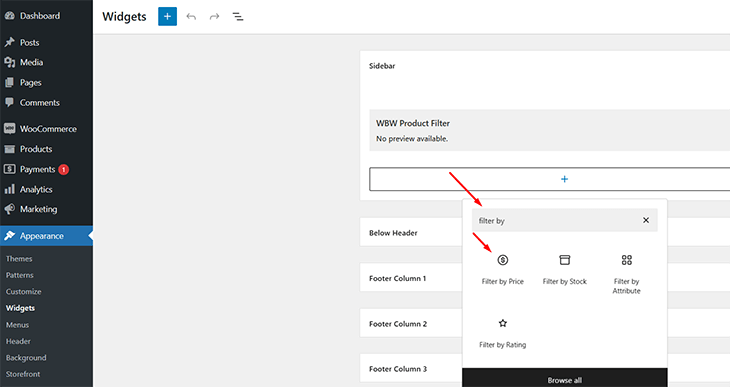
Search for Filter Blocks:
In the search bar, type “filter” to find WooCommerce’s available product filter blocks. Select the ones you want to include in your sidebar.
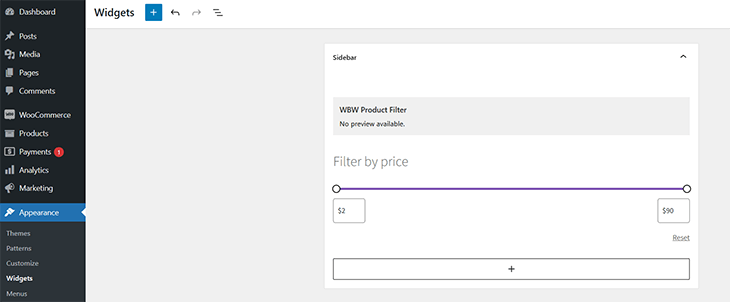
Add Your Selected Filters:
Choose from filters such as price, attributes, stock availability, or ratings. These options can be tailored to match your store’s needs.
Save Your Changes:
Once your filters are in place, click Update at the top-right corner of the page to apply the changes.
While WooCommerce’s built-in sidebar filters are helpful for providing basic search refinement, they may fall short for stores with extensive product catalogs. In the next section, we’ll delve into the limitations of these default options and discuss more robust solutions.
Drawbacks of WooCommerce’s Default Sidebar Filters
While WooCommerce’s built-in sidebar filters offer basic functionality, they fall short in meeting the diverse needs of modern eCommerce stores. Here’s why:
Limited Filtering Options
The default WooCommerce filters provide only four basic criteria: price, stock availability, product attributes, and product ratings. While these can assist customers in narrowing down their options, they lack flexibility for stores with more complex product catalogs.
For example, an electronics store might need filters for brand, battery life, or storage capacity. WooCommerce’s default filters don’t support adding custom options, making it difficult for customers to refine their searches effectively. This limitation can hinder shoppers from finding exactly what they’re looking for, leading to a subpar user experience.
Suboptimal User Experience (UX)
One of the biggest flaws of the default filters is the absence of AJAX functionality. Every time a customer applies a filter, the entire page reloads to display the updated results.
This constant reloading disrupts the browsing flow and creates a frustrating shopping experience, especially for customers who want to apply multiple filters or explore various options quickly. The lack of seamless filtering can deter users from completing their purchases.
Minimal Customization Options
WooCommerce’s default filtering system offers only basic styling, which can make the filters feel clunky and visually unappealing. Customizing filters to improve usability or align them with your store’s design is extremely limited.
For example, if you run a clothing or shoe store, you might want to use visually engaging elements like color swatches, image selectors, or tag labels. Unfortunately, the default options rely on plain checkboxes or dropdowns with text, which are less intuitive and less effective at engaging customers.
To overcome these limitations, you’ll need more advanced filtering tools that offer customization, flexibility, and a seamless user experience. Up next, we’ll explore how to address these challenges with enhanced sidebar filtering solutions.
The Bottom Line:
A weak filtering system can significantly impact your online store’s performance. When shoppers struggle to find the products they’re looking for quickly and easily, they’re far more likely to abandon your site and turn to a competitor. This issue becomes even more critical for stores with extensive inventories or complex product categories.
Today’s online shoppers expect a fast, seamless, and user-friendly filtering experience. Unfortunately, WooCommerce’s default sidebar filters often fall short of meeting these expectations due to their limited functionality.
To address these shortcomings, many store owners turn to specialized sidebar filter plugins that offer enhanced flexibility, performance, and customization.
In the following section, I’ll introduce you to the top-rated sidebar filter plugin for WooCommerce and show you how it can revolutionize your store’s product filtering system.
Discover the Best WooCommerce Sidebar Filter Plugin
When it comes to transforming WooCommerce’s standard sidebar filtering system into a more powerful and intuitive tool, WooCommerce Product Filter stands out as the ultimate solution. This advanced plugin not only enhances the default filtering options but also introduces robust search and sorting features tailored to modern eCommerce needs.
Recently recognized by Kinsta as one of the best WooCommerce product filter plugins.
Unmatched Flexibility and Customization
With WooCommerce Product Filter, you can create filters for virtually any type of product data. This includes:
- Attributes: Filter by model, color, size, brand, etc.
- Categories: Allow customers to refine their search within specific product categories.
- Tags: Provide a way to navigate products using relevant tags.
- Custom Fields and Taxonomies: Add advanced, store-specific filters for unique criteria.
Diverse Display Options
One of the standout features of this plugin is its versatility in displaying filters on your site. You can position the filters in multiple ways to suit your store’s design and improve usability:
- Left-Side Sidebar: A traditional placement for easy access.
- Right-Side Sidebar: Perfect for balancing your store’s layout.
- Slide-Out Panel: Activated with a button, this sleek option saves space.
- Above the Product Horizontal Grid: Ideal for a more prominent filtering option on catalog pages.
Visual Examples
Here’s a glimpse of how these filters appear:
- Left-Side Sidebar: A clean and accessible layout that integrates seamlessly with your store.
- Right-Side Sidebar: A practical and visually appealing alternative for stores with right-aligned designs.
By offering a highly customizable and visually dynamic filtering system, WooCommerce Product Filters ensures that your customers can find exactly what they’re looking for quickly and effortlessly.
In the next section, we’ll dive into how to install and configure this plugin to elevate your store’s user experience.
Streamlined Filtering for Mobile Shoppers
For mobile users, filtering options must be seamless and easy to use, especially since sidebars are often absent on smaller screens. WooCommerce Product Filters addresses this challenge with a “View Filters” button, positioned above the product list on mobile devices. When tapped, this button reveals a sleek, fly-out filter panel designed specifically for mobile optimization.

This approach mirrors the functionality of platforms like Etsy, where a simple button or icon provides access to a vertical filter panel. By adopting a similar design, WooCommerce Product Filters ensures a familiar and efficient experience for users on the go.
What makes this solution particularly appealing is its ease of setup and customization. Even without technical expertise, you can quickly configure the filters to suit your store’s needs. Comprehensive guides, detailed documentation, and an abundance of video tutorials are available to assist every step of the way. Additionally, the plugin’s support team is always ready to provide help, making it a user-friendly choice for enhancing your store’s mobile filtering experience.
Why Upgrading Your Store’s Sidebar Filters with WooCommerce Product Filters is a Game-Changer
Flexible Filtering Options for Every Need
WooCommerce Product Filters empowers you to create filters for virtually any criteria, giving your customers the tools they need to refine their searches effectively. Whether it’s product attributes like models, colors, sizes, and brands, or categories, tags, custom fields, and even unique specifications, this plugin has you covered. For instance, if your store sells furniture, you can configure filters to let shoppers narrow their search by material (wood, metal), style (modern, vintage), price range, stock availability, and more allowing multiple criteria to work seamlessly together for a personalized shopping experience.
Enhanced Browsing Experience
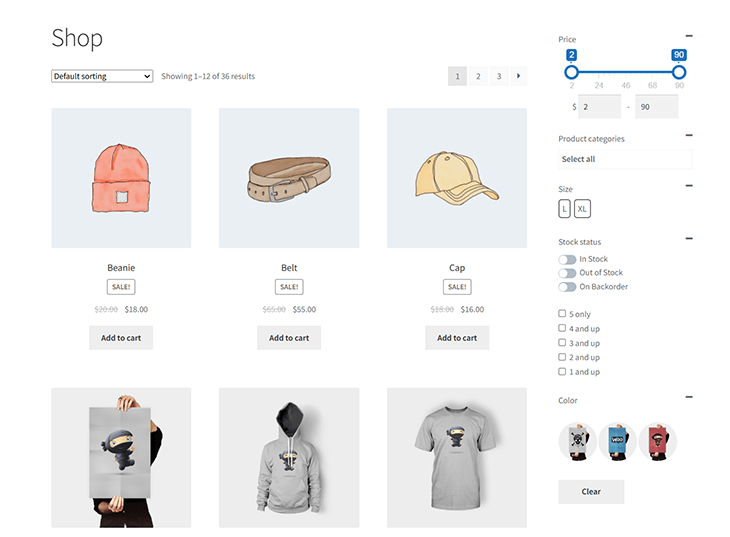 This plugin delivers a smooth, fast, and engaging browsing experience through its AJAX-powered functionality. As users apply filters, product listings update instantly without requiring a page reload. This real-time responsiveness keeps customers focused and eliminates the frustration caused by slow load times, significantly reducing the likelihood of abandoned searches.
Advanced Styling Options for Filters
Presentation matters, and WooCommerce Product Filters offers a range of visually appealing filter styles that elevate the customer experience. Move beyond the default WooCommerce checkboxes and use radio buttons, color swatches, image pickers, range sliders, tag clouds, and more. These customizations not only make filters more intuitive but also align them with your store’s branding, enhancing overall usability and aesthetic appeal.
The Bottom Line
WooCommerce Product Filters transforms your store’s default sidebar filters into a powerful, user-friendly, and SEO-savvy tool. The result? Customers enjoy a seamless browsing experience, finding exactly what they need quickly and efficiently, while your store benefits from increased engagement, better search rankings, and higher conversions.
Detailed Tutorial: How to Configure the WooCommerce Sidebar Filter Plugin
This guide will walk you through the process of configuring WooCommerce Product Filters for your online store. The entire setup can be completed in less than 10 minutes, so let’s jump right in!
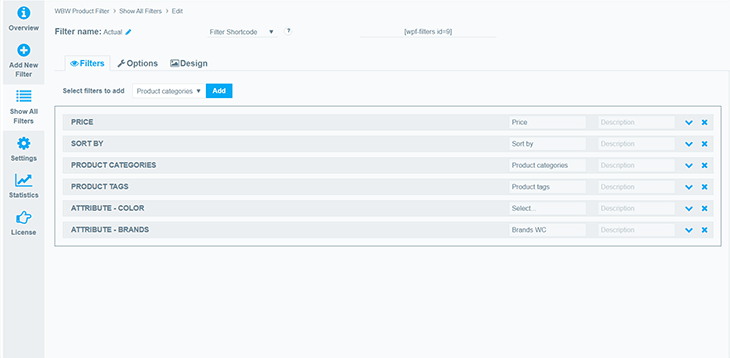
Step 1: Configure the Core Product Filtering System
- Install and Activate the Plugin
Start by adding the WooCommerce Product Filters plugin to your site and activating it. - Create a new filter
Open the filter’s setup to configure your filters. - Filter sections configuration
Open the Filters tab and add all the sections you need. - Set Filter Visibility
For desktops and tablets, choose one of these options:- For All Devices.
- Only For desktops.
- Only For Mobile.
- Decide whether filters should always be visible or hidden with a toggle button for access.
- Enable Collapsible Filters
If your store offers multiple filter options, enable the Title toggle feature to allow users to expand or collapse individual filters. Set the default toggle state to open or closed based on your preference. - Filter Mode Configuration
Select how filters are applied:- Auto-Apply: Instantly updates results when filters are selected.
- Manual Apply: Customers click an “FILTER” button to finalize their selections.
The manual option is recommended for letting customers refine multiple criteria before viewing results.
- Product Count Display
Enable the product count feature to show customers how many items match each filter option. This provides valuable context and improves the browsing experience. - Finalize the Setup
Click “SAVE” to finish the basic setup.
Step 2: Create and Customize Product Filter Groups
After installation, the plugin generates a default filter group. You can use it as is or modify it to suit your needs.
- Access Filters in Admin Panel
Navigate to Filters in your WordPress dashboard. - Edit the Default Filter
- Open the “Edit” page for the default filter.
- Rename the group if needed, especially if you plan to create additional filter groups.
- Customize Filter Options
Modify each filter option to fit your requirements. Examples include:- Renaming filters for clarity.
- Changing filter types (e.g., dropdown, radio button).
- Adjusting criteria for filtering options.
- Using visual styles like image pickers, color swatches, or range sliders.
Step 3: Customize the Filter Group Appearance (Optional)
WooCommerce Product Filters seamlessly inherits your theme’s design, but you can further customize the look to align with your brand.
- Access Design Settings
Go to Filters → Design tab in the admin panel. - Edit Filter Text
Update labels for buttons like “Filter” or “Clear” to match your store’s tone, such as “Refine Results” or “Update Search.” - Modify Visual Design
Adjust colors or filter title styles to enhance appearance. - Save Changes
Click “Save” to apply updates.
Step 4: Add Sidebar Filters to Your Store’s Front-End
Once your filters are configured, adding them to your site’s sidebar is straightforward.
- Navigate to Widgets
In your WordPress dashboard, go to Appearance → Widgets. - Add a Filter Block
Locate the sidebar panel where you want the filters to appear. Click the “+” icon to add a block. - Insert Product Filters
- Search for “Filter” in the block search bar.
- Select the “WBW Product Filter” block.
- Enter a title for the filter widget.
- Choose the appropriate filter group from the dropdown menu.
- Update the Sidebar
Click “Update” at the top-right corner of the page to save your changes.
On the front end, your filters will now appear in the sidebar, allowing customers to refine their searches efficiently. This placement enhances navigation and provides a smoother shopping experience.
With these steps, your WooCommerce store will feature an intuitive and powerful sidebar filtering system tailored to meet your customers’ needs.
Pro Tips for Optimizing WooCommerce Sidebar Filter Options
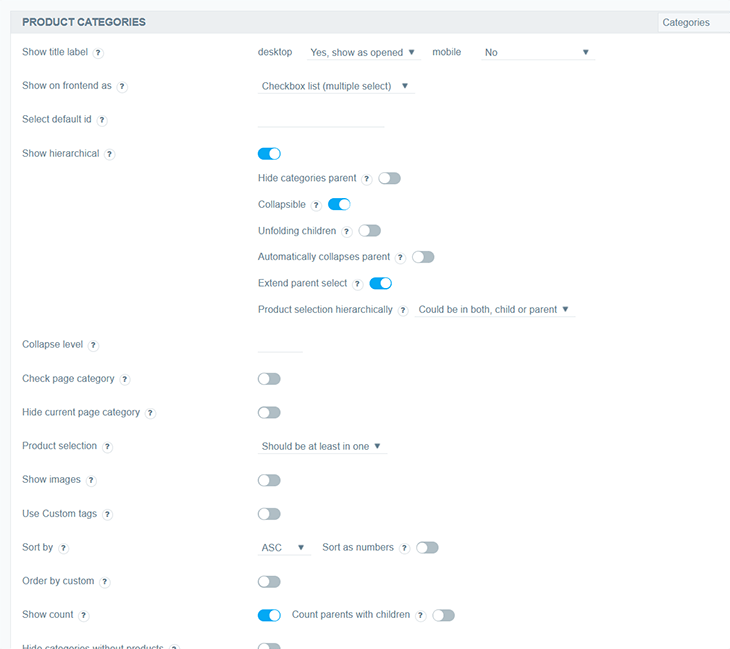
Enhancing your WooCommerce sidebar filters can significantly improve your customers’ shopping experience. Here are five detailed tips to help you maximize their effectiveness:
1. Position Filters on the Left Side of the Page
Research by the Nielsen Norman Group indicates that users focus most of their attention approximately 80% on the left side of a webpage. This is also where shoppers expect filters to be when browsing online stores.
By placing filters on the left, you align with user expectations, making it easier and more intuitive for them to refine their search and find the products they need quickly. This small change can significantly enhance usability and reduce frustration.
2. Use Clear and Concise Labels
The Baymard Institute’s eCommerce UX benchmark highlights a critical flaw: 62% of online stores use unclear filter labels. This can lead to confusion and cause customers to skip useful filtering options.
When naming your filters, avoid technical jargon or overly creative language. Instead, opt for straightforward, easily understood labels. For instance, use “Price Range” instead of “Budget Selector” or “Color” instead of “Shade Spectrum.” Clear labels ensure that customers instantly understand the purpose of each filter.
3. Organize Filters Hierarchically
A logical and hierarchical arrangement of filters helps customers navigate your options efficiently. Start with broad, commonly used filters like Price, Category, or Brand at the top. Place more specific options, such as Screen Size, Material, or Features, further down.
For example, in an electronics store, filters like “Brand,” “Price,” and “Category” should appear first, followed by “Battery Life,” “Storage Capacity,” or “Processor Type.” This step-by-step refinement allows users to narrow their search without feeling overwhelmed by too many options at once.
4. Incorporate Visual Filters for Certain Products
Visual filters are particularly effective for certain product categories. If you sell apparel, for instance, color swatches or image pickers are far more intuitive than plain dropdown menus with text options like “Red” or “Blue.”
These visual aids allow customers to quickly identify and select their preferences, creating a more engaging and efficient filtering experience. Similarly, for furniture or décor, you could use thumbnail images to represent materials or styles.
5. Show Product Counts Next to Filter Options
Displaying the number of products available for each filter option helps set clear expectations for customers. This feature prevents the frustration of selecting a filter only to find there are no matching results.
For example, a filter for “Black Shoes (12)” immediately informs the customer that 12 products meet their criteria. Product counts also guide users toward filters that are more likely to yield relevant results, streamlining their shopping journey.
By implementing these tips, you can transform your WooCommerce sidebar filters into a user-friendly tool that enhances navigation, improves customer satisfaction, and ultimately drives more sales for your store.
Upgrade Your Store with WooCommerce Sidebar Filters
Efficient sidebar filters are essential for helping your customers refine their searches and quickly find exactly what they need.
While WooCommerce includes a few basic sidebar filters by default, they come with significant limitations. The default options lack the flexibility to handle diverse product catalogs and are not powered by AJAX, meaning the page reloads every time a new filter is applied-a frustrating experience for shoppers.
Enter WooCommerce Product Filter, a cutting-edge, AJAX-powered plugin that transforms WooCommerce’s simplistic sidebar filters into sleek, modern, and highly functional tools. Here’s how this plugin can revolutionize your store:
- Customizable Filters for Any Parameter
Design filters for virtually any product data, including custom fields, taxonomies, categories, tags, attributes, and more. - Diverse Styling Options
Choose from a wide range of visually appealing filter styles such as color swatches, image pickers, dropdown menus, radio buttons, and more, tailored to your store’s aesthetic. - Flexible Placement
Add filters anywhere on your site:- Left or right sidebars.
- Above the product listings.
- A mobile-optimized popup panel for on-the-go shoppers.
- Any custom location using shortcodes.
With WooCommerce Product Filters, you can set up powerful, intuitive sidebar filters in just ten minutes, creating a seamless shopping experience that keeps your customers engaged and satisfied.
Don’t settle for basic filters transform your store today with WooCommerce Product Filters!