Today electronics shops are one of the most popular online stores in the world. So, if you sell gadgets, computers, smart tech, other electronic devices, and similar items – then this post is exactly for you! Take a moment and you will become a master in creating a perfect online catalog for your goods with WooBeWoo Product Table plugin.
What does exactly ‘product catalog’ means?
Product catalog allows you to create an item’s list in a clear and structured way. Users will be able to scroll down the goods, filter and sort them according to a category. Also, people need an option which will let them buy products straight from the catalog view. This is an “Add to cart” button.
- How to create pagination, sorting, filtering options?
- How to include multiple add to cart?
- What are the product’s attributes and categories?
In this tutorial, we will answer those questions and any others related to a product catalog.
How to add products?
Before creating a product catalog, it is important to dive into the logic on how products work in WooCommerce. There are several types:
- Simple: they are easily shipped and have no additional options. For instance, headphones
- Grouped: consist of simple products. For instance, thermocurlers
- Virtual: doesn’t require shipping. For instance, glass-replacing on the phone
- Variable: goods with different variations like color, memory size, etc.
Every product type incorporates certain differences with the downloading. We will add a simple product, as the most popular type.
Simple products
Navigate WooCommerce -> Products -> Add New. Enter a Name and Description, like writing a post in WordPress.

Add a new product
Then scroll down and you will see Product data block. Choose the product type. If it is a virtual product (service) check it. Also, this block has several sections.
General section:
- Regular price – normal price
- Sale price – price under discount

Set a product price
Inventory section:
- SKU – Stock keep unit. It has to be unique for every item
- Manage stock – check it if you want the stock status be visible in the Product Data inventory box. If you do not check, you need to select the item’s stock status. If you check, then, select a stock quantity and and backorders
- Sold individually option limits the product to one per order

Inventory section
Shipping section:
- Weight – weight of the item
- Dimensions – length, width and height
- Shipping class

Shipping section
Linked products section:
- Upsells – link with a similar products to boost your sales
- Cross-cells
In our previous blog post you can read the difference between upsells and cross-sells.

Linked products section
Attributes section:
- Custom product attribute – assign details to a product (sets what you are created before)

Attributes section
Advanced section:
- Purchase note – optional note wich will be sent to a customer after purchasing
- Menu order – ordering position
- Enable reviews

Advanced section
After you fill these fields, let’s move to the Product short description. Here add an excerpt from your long item’s description.

Product short description
It’s not over yet! See the menu tab on the right? Now we will see more closely on these windows. First of all select theProduct Categories. And then add Tags. The last step here is to choose the Product image.


Product Categories Product image
And now your product is ready to be published. But, wait there are several additional options. You can determine which shop products will be listed on:
- Shop and search results (recommended options)
- Shop only
- Search results only
- Hidden.
Featured product option allows you to promote your item in a product category additionally.

Publish section
How to add a product to the WooBeWoo Product Table plugin?
WooBeWoo Product Table plugin is a simple way to list all the selected items on the site, create it automatically, add caption, sorting, pagination, and other interesting things.
Firstly, you need to install the plugin. Navigate to Plugins -> Add New, and, then type “Product Table WooCommerce by WooBeWoo”. After that, click “Install” and “Activate”. If everything is correct, you will see a new plugin, ready to work in the admin menu. Click on it and move to the next step.
WooBeWoo Product Table plugin use the products already created with WooCommerce. Here you can adjust all the default settings, and download them using a CSV/XML import or create them manually using the instruction described above.

Add New Product table
So, let’s create a product table for the tech items. In the plugin, click the “Add new table”, and enter the title of the table. Finally, press on the Create button.

Create New Product table
After you have created a product table, you need to add an items. Remember, that they are synchronized with WooCommerce products? Therefore, you will see all the available goods listed on the first page. Select only those which are applied for your store.
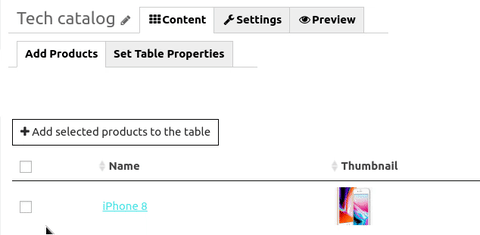
Add products to the table
Now move to the next tab and set table properties, like:
- Name
- Thumbnail
- Price
- Categories
- Date
- SKU
- Quantity
- Attribute
- Summary
- Buy.

Set table properties
To customize the product table click on Settings -> Main. It includes such options:
1 – Caption
2 – Description
3 – Signature
4 – Header
5 – Footer.
Fixed Header allows to fix the table’s header during table scrolling.
Also, you can tune the date format. Features Tab enables to activate additional functions to work with the table. In the Appearance Tab customize the visual style, and in the Language and Text Tab change the settings of service text. Click Preview and see your results.
Read more information in our documentation.

Main section
Finally, add a product table to the site content via Table Shortcode and Table PHP code. Here is one important option: insert the shortcode only in a text editor page, and not in the visual.
Congratulation! You have just created the product table catalog for the tech online store.