If your WooCommerce store has a wide range of product categories, it’s vital to provide your customers with an easy way to find products by category. With the right tools, you can add a category filter to your store, improve the shopping experience, and boost your sales!
The Importance of Product Filters
Product filters enhance the shopping experience by allowing customers to quickly and easily locate specific products. It’s no wonder that an increasing number of online store owners are implementing advanced filtering systems.
However, the default filters that come with WooCommerce are limited. While there’s a basic Product Categories widget that lists your categories as links, it lacks true filtering functionality. Customers expect more—especially if they’re accustomed to advanced category filters like those found on other popular e-commerce platforms.
Why Is Category Filtering Challenging in WooCommerce?
Many non-WordPress online stores let customers filter by category with simple checkboxes or dropdown menus. Unfortunately, WooCommerce doesn’t include a built-in category filter widget, which can make your store feel less intuitive in comparison. This gap in functionality can be frustrating for both store owners and customers.
The Good News: There’s an Easy Solution
Thankfully, adding a WooCommerce category filter to your store is simple. By using the right tools, you can:
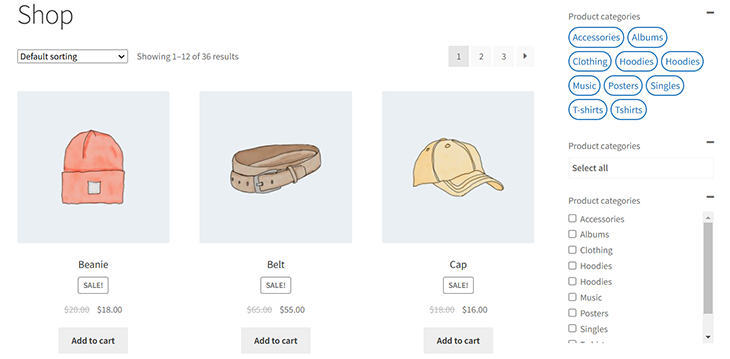
- Implement category filtering with checkboxes (like in the example above).
- Explore other filtering styles, including clickable images, dropdowns, radio buttons, and text labels.
Keep reading to learn how to set up category filters in WooCommerce and provide your customers with the seamless shopping experience they expect.
Why Use Product Filters?
WooCommerce is the go-to e-commerce platform for building online stores, known for its flexibility and popularity. However, its default filtering tools leave much to be desired. The built-in widgets allow filtering by basic attributes like price, rating, or product tags, but they’re limited in functionality. Worse, there’s no built-in category filter to help customers refine their search by specific product types.
By adding category filters, you can elevate your store’s functionality and make it easier for customers to find exactly what they’re looking for—faster. The easier it is for customers to locate products, the quicker they’ll move to checkout, increasing sales and satisfaction.
Key Benefits of Filtering by Category
- Enhances User Experience
Customers can quickly locate the exact types of products they want without sifting through irrelevant results. - Lowers Bounce Rates
If customers find what they’re looking for quickly, they’re more likely to stay on your site, explore product pages, and complete purchases. - Boosts Product Visibility
Category filters allow customers to view more specific product groups, driving engagement and increasing the chances of conversions. - Increases Conversions
When customers can refine their searches efficiently, they’re more likely to take action, whether it’s adding products to their cart or completing the checkout process.
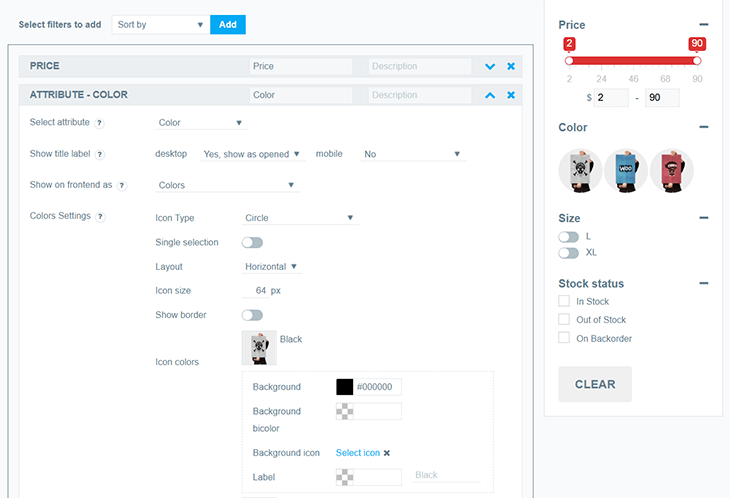
The Power of Combining Filters

Category filters shine brightest when paired with other filter types. Imagine allowing customers to filter products by:
- Price range
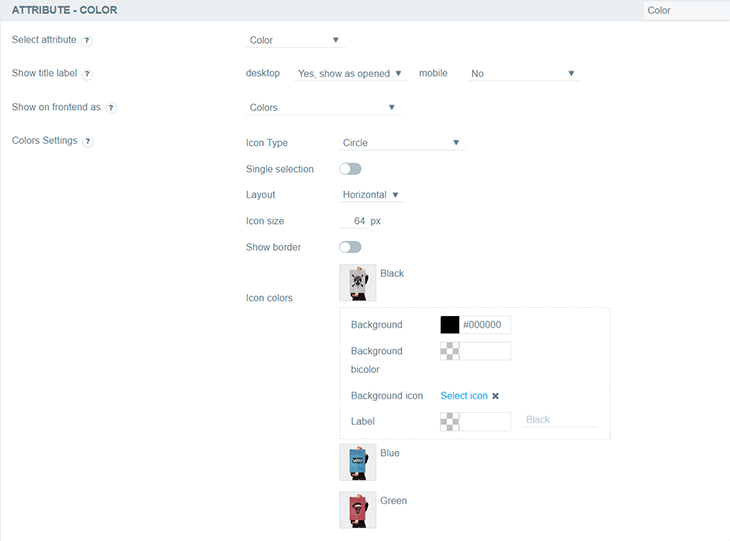
- Color
- Attributes (like size or brand)
- Availability (in-stock items)
This combination enables customers to drill down their search for hyper-relevant results, significantly enhancing their shopping experience.
Real-Life Example
Scenario 1: No Category Filters
A customer looking for a blue Cap within a $30 budget uses a basic category widget.
They’re presented with a long list of all Caps, forcing them to scroll through dozens of irrelevant options to find one that matches their preferences.
Scenario 2: With Category Filters The same customer uses advanced category filters. They select:
- Category: Cap
- Color: Blue
- Price Range: $30–$40
As a result a refined product list showing only blue Caps that fit their budget—saving them time and improving their experience.
Conclusion: Add WooCommerce Category Filters Today
Category filters don’t just improve navigation—they transform the shopping experience. By giving customers intuitive tools to refine their searches, you can reduce frustration, increase engagement, and ultimately drive more sales.
If you’re ready to take your WooCommerce store to the next level, consider implementing category filters today!
Introducing WooCommerce Product Filters
WooCommerce Faceted Search Filters
Display category filters as images, dropdowns, checkboxes—however you prefer!
The WooCommerce Product Filters plugin makes it simple for store owners to set up dynamic AJAX filters for categories, product attributes, or taxonomies. It allows you to create multiple filter types and display them on your WooCommerce shop and category pages with ease.
Why Choose WooCommerce Product Filters?
The WooCommerce Product Filters plugin was designed to meet the need for a user-friendly, high-quality AJAX filter plugin. It’s ideal for both developers and non-coders who want to add advanced category filters without any technical hassle.
Here’s what makes it stand out:
- Filters can be based on categories, attributes, custom taxonomies, tags, colors, price sliders, and more.
- Displays the total product count next to each filter option.
- Works seamlessly across WooCommerce shop and category pages.
- Perfect for anyone looking for a reliable category filter plugin.
Filter Styles: Flexible Options for Every Store
With WooCommerce Product Filters, you can implement category filters in various styles to suit your store’s needs:
Dropdowns
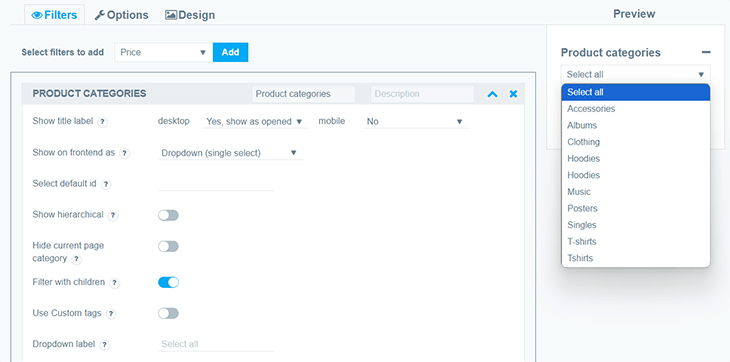
Create a clean, hierarchical list view for categories. Customers can filter by selecting one category at a time.
- Ideal for stores with multiple parent and subcategories.
- Displays parent-child relationships clearly.
- Supports dependent dropdowns, where additional dropdowns appear dynamically based on previous selections. For instance, car parts stores often use this feature to narrow searches by make, model, and year.
Checkboxes
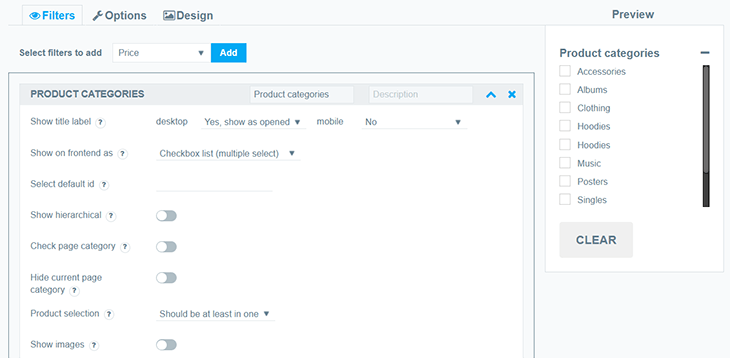
Checkbox filters allow customers to select multiple categories simultaneously.
- Perfect for stores selling similar products in overlapping categories, such as clothing or accessories.
- Customers can choose options like Blouses, T-Shirts, and Tunics to refine their search.
- One of the most user-friendly and popular filtering options.
Radio Buttons
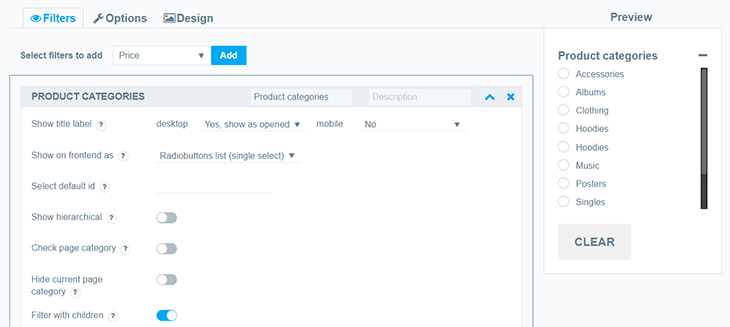
Radio button filters let customers choose a single category at a time, displaying all available options at a glance.
- Great for simple product selections.
- Encourages focused searches while providing an intuitive interface.
Why Use WooCommerce Product Filters?
By enabling flexible category filters on your store, you can:
- Offer a better shopping experience.
- Reduce browsing time for customers.
- Help customers find exactly what they’re looking for quickly.
Ready to enhance your WooCommerce store? The WooCommerce Product Filters plugin is the easiest way to implement category filters that boost engagement and drive sales.
Start customizing your filters today and transform the way customers interact with your products!
Text Labels
The text labels option displays WooCommerce categories in a tag cloud format. Customers can click on a label to instantly view products from that category.
- Similar to checkbox filters, multiple text labels can be selected simultaneously.
- Provides a clean and simple way to browse by category.
Images
With the images filter option, you can display category thumbnails (with or without category names) for a visually appealing way to refine searches.
- Customers click on category images to filter results.
- Supports multiple selections, similar to checkbox and text label filters.
- A great choice for visually driven stores, like fashion or home décor.
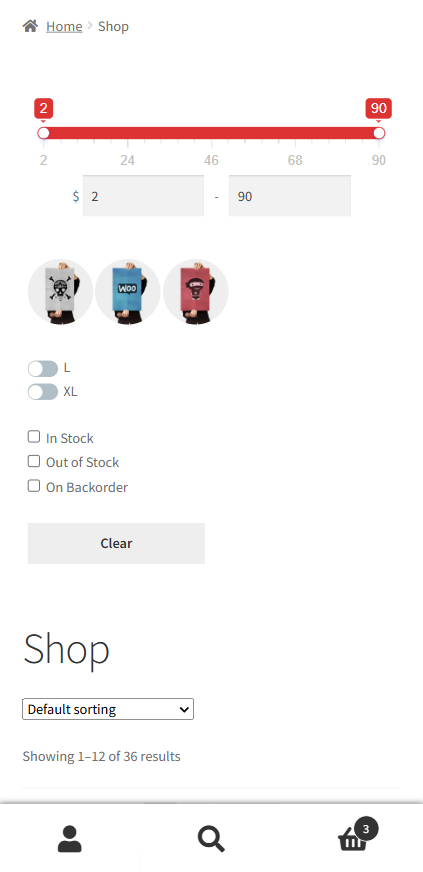
Adding Filters Above Product Listings
While many WooCommerce category filters appear as sidebar widgets, they can also be displayed at the top of product listings.
- Filters can appear as dropdowns, checkboxes, radio buttons, images, or text labels at the top of the Shop and category pages.
- Example: A checkbox filter displayed above the Shop page makes it easy for customers to refine their search without scrolling.
Mobile-Friendly Category Filters
With most e-commerce purchases happening on mobile devices, it’s crucial to optimize filters for smaller screens.
The WooCommerce Product Filters plugin makes mobile filtering seamless by offering two key options:
- Dropdown Filters Above the Shop: Compact and non-intrusive, dropdowns are perfect for mobile layouts.
- Slide-Out Panels: Customers tap a button to reveal hidden filters, keeping the screen clutter-free. This feature is also available for desktop users.
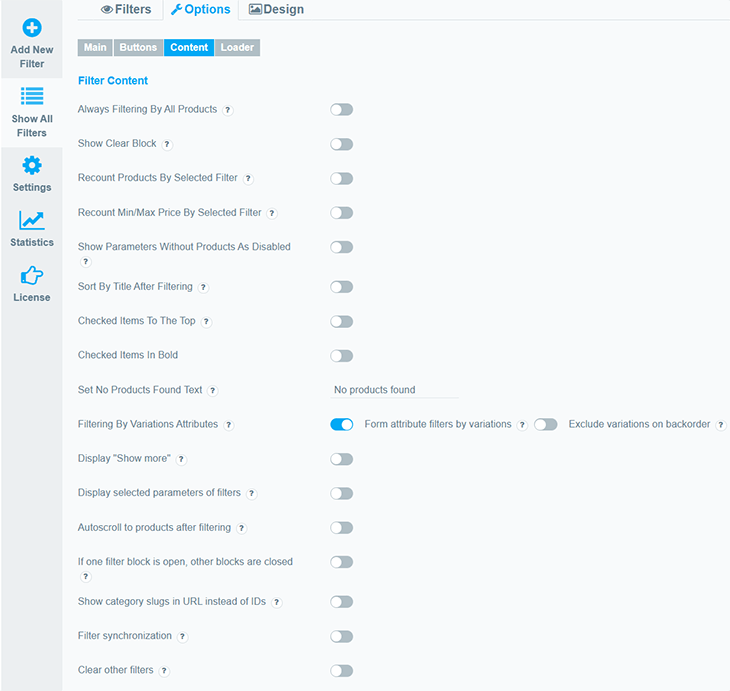
Organizing WooCommerce Category Filters
A standout feature of this plugin is its ability to organize filters into structured groups.
- Filters can be displayed individually or grouped for logical navigation.
- Hide invalid filter options or uncategorized products.
- Allow customers to clear filters or auto-scroll to the top of the page after selecting a filter.
You can also display the total product count next to each filter option, helping customers see how many products fall into each category.
Steps to Add WooCommerce Category Filters
Install and Activate the Plugin.
Step 1: Create Product Categories
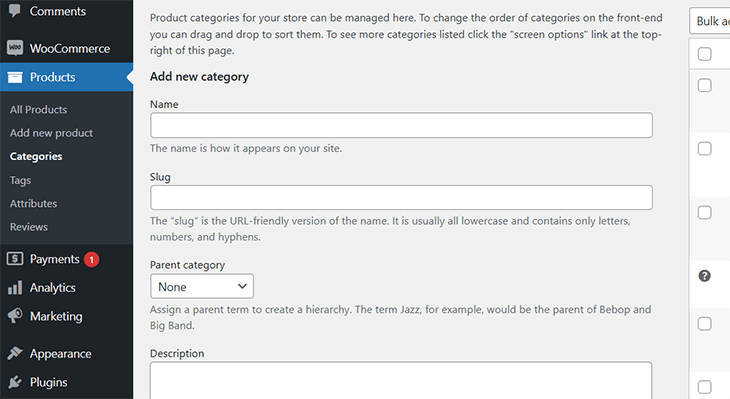
To establish product categories that will be used in the filter, follow these steps:
- Access Product Categories:
- Navigate to WooCommerce > Products > Categories in your WordPress admin dashboard.
- Define a New Category:
- Name: Enter the name of the category (e.g., “Sale”).
- Slug: Specify a URL-friendly identifier for the category (e.g., “sale”).
- Parent Category: If this category is a subcategory, select the parent category from the dropdown list. Otherwise, leave it blank for a top-level category.
- Description: Optionally, add a description to inform customers about this category.
- Save the Category:
- Click the Add New Category button.
- The newly created category will appear in the category list.
Step 2: Assign Categories to Products
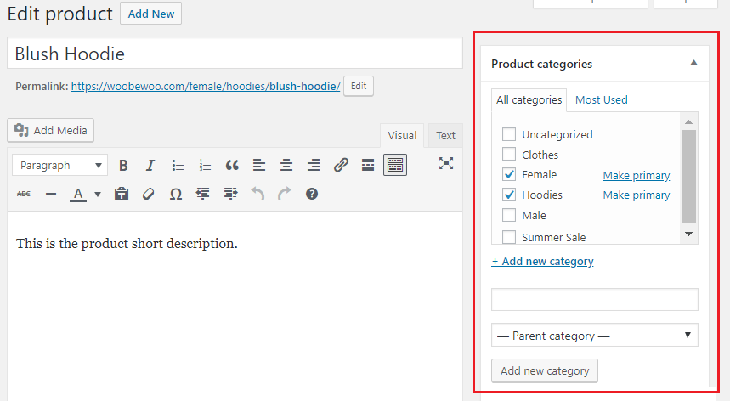
Once categories are set up, assign them to relevant products:
- Edit a Product:
- Go to WooCommerce > Products and select the product you want to edit.
- Assign Categories:
- In the right-hand panel, locate the Categories section.
- Check the relevant category box or select multiple categories if applicable.
- Save Changes:
- Update or publish the product to apply the category changes.
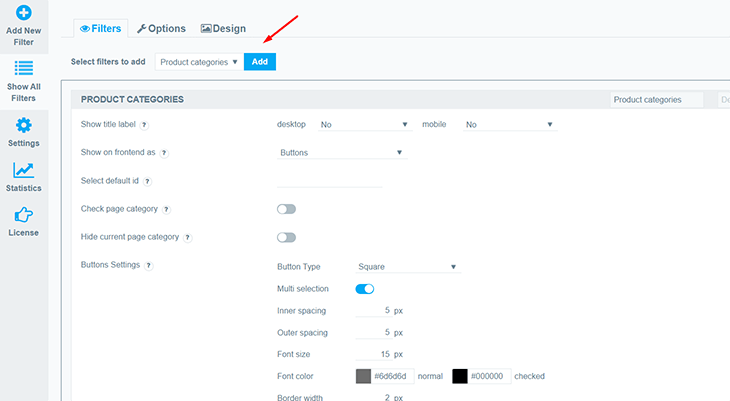
Step 3: Add a Product Category Filter

To enable filtering by category, use the Product Filter plugin’s configuration:
- Access the Filter Settings:
- In the WordPress admin dashboard, navigate to WBW Product Filter > Show All Filters
- Create a New Filter:
- Locate the Filter Elements section.
- Select the Category option from the dropdown list.
- Click the Add button to create a new filter.
- Configure the Filter:
- Title: Name the filter, such as “Filter by Category.”
- Source of Items: Choose Category to pull product categories dynamically.
- Display Style:
- Select how the filter will appear (e.g., dropdown, checkbox list, radio buttons).
- Hierarchical Display: Enable this option if you want subcategories to appear nested under their parent categories.
- Appearance: Customize the filter’s appearance and other Category filter options to match your site.
- Save the Filter:
- Click Save to finalize the filter settings.
Step 4: Implement the Category Filter on Your Store
Choose where and how to display the filter on your WooCommerce store:
- Use Widgets:
- Go to Appearance > Widgets.
- Add the WBW Product Filter widget to your desired sidebar or widget area.
- Select your newly created category filter from the widget’s dropdown menu.
- Use Shortcodes:
- Retrieve the shortcode for your category filter from the plugin’s settings.
- Paste the shortcode into the content area of any page or post where you want the filter to appear.
How to Add and Customize Category Filters in WooCommerce
Adding category filters to your WooCommerce store has never been easier, thanks to the WooCommerce Product Filters plugin.
Follow these simple steps to enhance your store’s functionality and user experience.
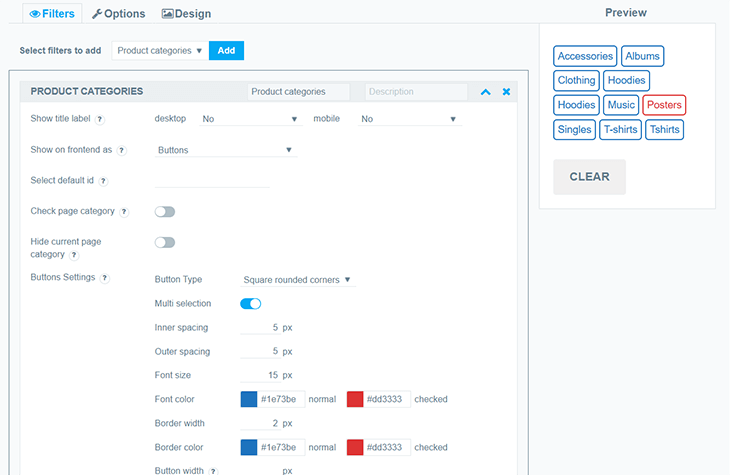
Edit Filter Title and Description
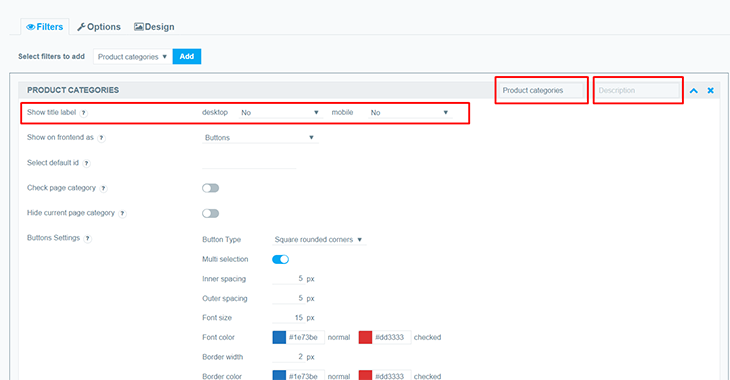
- Show Title Label: Decide how the filter title appears, including its open/close functionality:
- Desktop: Options are No, Show as Closed, or Show as Opened.
- Mobile: Options are No, Show as Closed, or Show as Opened.
Display Options
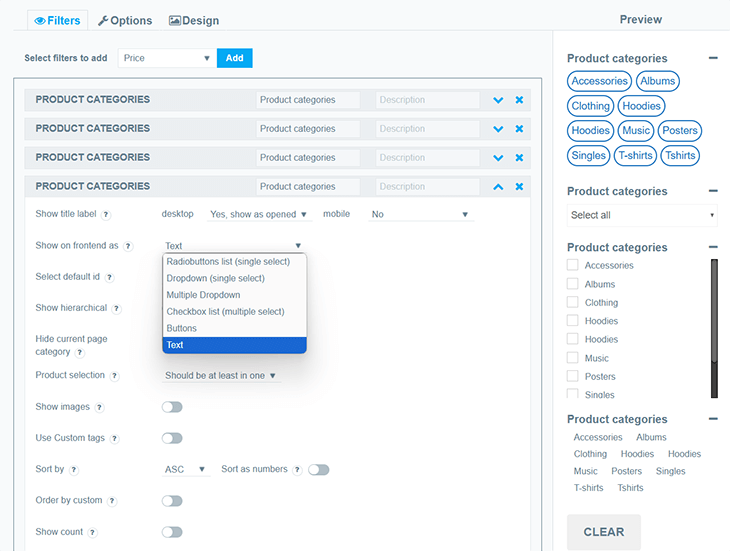
- Show on Frontend As: Choose how the category list is displayed, depending on whether single or multiple selections are allowed:
- Radiobuttons List (single select)
- Dropdown (single select)
- Checkbox List (multiple select)
- Multiple Dropdown: Includes Single Select Mode, allowing only one item to be selected.
- Buttons
- Text
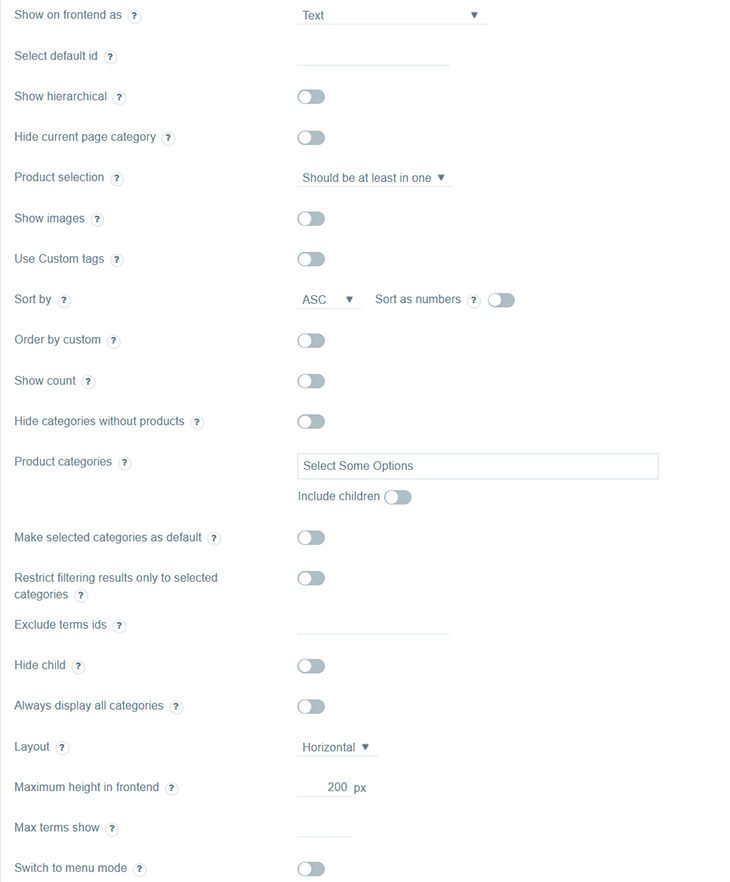
- Show Hierarchical: Display parent and child categories (applies to checkbox lists). Ensure parent categories are selected if only certain categories are shown.
- Hide Categories Parent: Show only child categories.
- Collapsible: Enable this to show only parent elements. Child categories will remain collapsed (available for Radiobuttons List and Checkbox List).
- Extend Parent Select: Automatically include child categories when a parent category is selected (available for Checkbox List with multiple select).
Category Selection Behavior
- Check Page Category: Automatically select the current category on category pages.
- Check Parent: Select only parent categories.
- Filter with Children: Extend the filter results to include products from child categories when a parent category is selected.
Additional Display Features
- Show Images: Display category images (not compatible with Dropdown).
- Show Alphabetical Index: Add an alphabetical index for parent elements only.
- Use Custom Tags: Customize the filter title tags. Any blank settings will default to standard tags.
Sorting and Ordering
- Sort By: Arrange categories in ascending or descending order.
- Order by Custom: Display categories based on the order of their selection in the input fields.
Product Count Options
- Show Count: Display the number of products available in each category.
- Count for Parent Category: Include the count of products in both the parent category and its children.
- Hide Categories Without Products: Do not show categories without any associated products.
Category Selection Settings
- Product Categories: Select which categories to display. Use the following shortcuts for multiple selections:
- Hold Shift to select a range.
- Hold Ctrl (Windows) or Command (Mac) to select specific categories.
- Use Ctrl + A (Windows) or Command + A (Mac) to select all categories.
- Make Selected Categories Default: Mark selected categories as default and hide them on the frontend.
- Clear Filter Only to Selected Categories: When clearing the filter, ensure it resets only to the selected categories. Be cautious when using multiple category filters simultaneously.
- Exclude Terms by IDs: Exclude specific categories by entering their IDs (e.g., 1,2,3).
Search and Layout Options
- Show Search: Enable a search bar for finding categories by name.
- Hide Child Taxonomy: Prevent child taxonomies from being displayed.
- Always Display All Categories: Show the complete list of categories regardless of the filtered items.
- Layout: Choose a vertical or horizontal layout and set the number of columns.
- Maximum Height on Frontend: Set the maximum height for the category list on the frontend.
Advanced Options
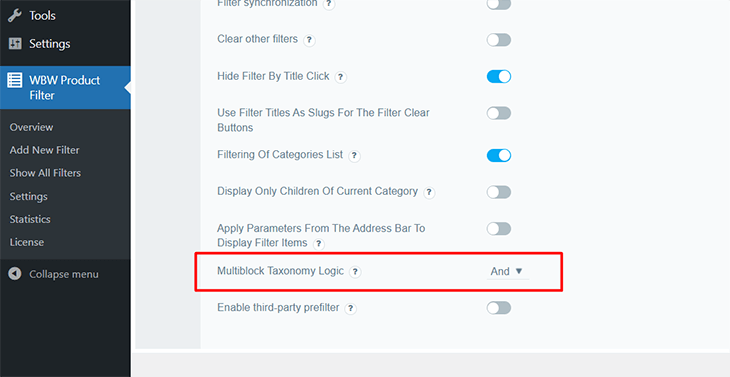
- Multiblock Taxonomy Logic: Define the logic for multiple filters based on different taxonomies:
- OR: Results match any filter criteria.
- AND: Results match all filter criteria.
To configure this, go to Options > Content and locate the Multiblock Taxonomy Logic dropdown.
By following these steps, you can effectively create and customize a category filter that enhances your WooCommerce store’s usability.
Integrate with Other Plugins
The WooCommerce Product Filters plugin integrates seamlessly with third-party tools like the WooCommerce Product Table plugin. This combination allows you to create dynamic one-page order forms with built-in category filters for faster, more convenient shopping.
Get WooCommerce Product Filters today and watch your sales grow!